What is an Amazon Virtual Desktop?
Amazon Virtual Desktop is a secure Windows desktop that provides access to WeightWatchers and Weekend Health applications. It is required for maintaining compliance.
You must sign into your AWS Virtual Desktop at the beginning of your shift each day.
Step 1: Downloading and Installing the WorkSpaces Client
You must install the client on every personal computer you intend to use to access the Virtual Desktop.
To access Amazon Virtual Desktop, you must install the WorkSpaces Client on your Mac or PC. Click this link to download and install the appropriate Amazon WorkSpaces Client for your operating system.
Step 2: Accessing Your WorkSpace
Each time you access Amazon Workspaces after it has gone to sleep or has been idle for over an hour, it may take 2–4 minutes to boot back up.
Note: Please follow the steps outlined below to successfully build and set up your WorkSpace. DO NOT SKIP A STEP.
- On your personal computer, launch Google Chrome and go to OKTA. (WW.OKTA.COM) Log in with your credentials (Username (First.Last)).
- Search for WW WorkSpace and click on it to access your WorkSpace.
- Click on Open Amazon WorkSpaces App. You will be redirected to the WorkSpaces application.
- Click Continue to sign in to WorkSpaces.
Step 3: Setting Up Workspace ONE Intelligent Hub
This step can take up to 15 minutes, and the WorkSpace will automatically reboot. During this time, WW MDM will begin installing all the necessary applications for your daily tasks. Please be patient and allow the computer to complete its configuration.
- Once you reach the Windows desktop screen, click in the search bar, and type in Workspace ONE Intelligent Hub, and click on it to launch the application.
- Enter ww-dm.awmdm.com in the Email or Server Address field and click Next.
- For the Group ID, enter WWI_WHTX and click Next.
- On the OKTA screen, enter your Username (First.Last) and Password, then click Sign In and approve the push notification.
- Click Done on the Congratulations Screen.
- You should now see Hello, "First Name" screen.
- Your Virtual Desktop will reboot and take you back to the Amazon WorkSpaces application screen, where you will then re-login.
- Please allow 60 seconds for the WorkSpace to reboot before logging back in, Click on Continue to sign in to WorkSpaces.
- Click on Get Started on the Hello, First Name screen
- Click on X on the top right hand corrner of the window to Close it.
Note: This step can take up to 15 minutes, and its a one time setup process. Please be patient and allow the computer to complete its configuration.
Step 4: Setting up & Signing into Google Chrome
- Double-click on Google Chrome icon on the Desktop
- Click on Don't Sign in
- Click on Got it
- Enter ww.okta.com in the browser and hit enter.
- Sign into OKTA, and validate your MFA
- Click on G Suite Mail Tile on the Okta Dashboard.
- Click on Continue, then click Continue as (Username).
- On the Top Right Corner of the current windows, please Click on your Image.
- Click Turn on Sync
- Click Add existing browser data to managed profile, and then click Contuine
- Click Yes, I'm In
- Close all other Open Tabs
You have successfully signed into Google.
Step 5: Setting up & Signing into Slack
- Go back to the Okta Dashboard Tab and click on Slack Grid Tile.
- Click Launch in Slack on the Weekend Health Tile.
- Click on the down arrow on weightwatchers.enterprise.slack.com and select Open the Slack App.
- Click Open Slack to launch the desktop client.
You have successfully signed into Slack and launched the desktop client.
Step 6: Setting up & Signing into Zoom
- On the Amazon Workspace Desktop, Click on the Zoom VDI Workspace icon
- Click Sign in
- Click on SSO and enter weightwatchers and click on Contuine
- Enter your Okta User Name and Password and sign in and accept your MFA
- Click on Launch Zoom
- Click Open Zoom Meetings
- Click OK To accept the record policy
You have successfully signed into Zoom and launched the desktop client.
Step 7: Setting up & Signing into AppGate
AppGate is WW’s VPN software, and you are required to sign in each time you start your shift.
- In the search bar at the bottom of the Virtual Desktop, type AppGate and then click on AppGate SDP.
- Click Approve
- Enter your Okta User Name and Password and sign in and accept your MFA
You have successfully signed into AppGate.
Step 8: Setting up & Signing into Google Drive
- In the search bar, enter Google Drive and then click on Google Drive
- Click Get Started
- Click Sign In
- Click on your User Name
- Click Sign In
You have successfully signed into Google Drive.
Step 9: How to fix Webcam issues for Mac
Part 1 - Camera/Audio/Screen sharing (This is a ONE time change only)
- Complete this Step on your personal Mac device and NOT on your AWS Virtual Desktop.
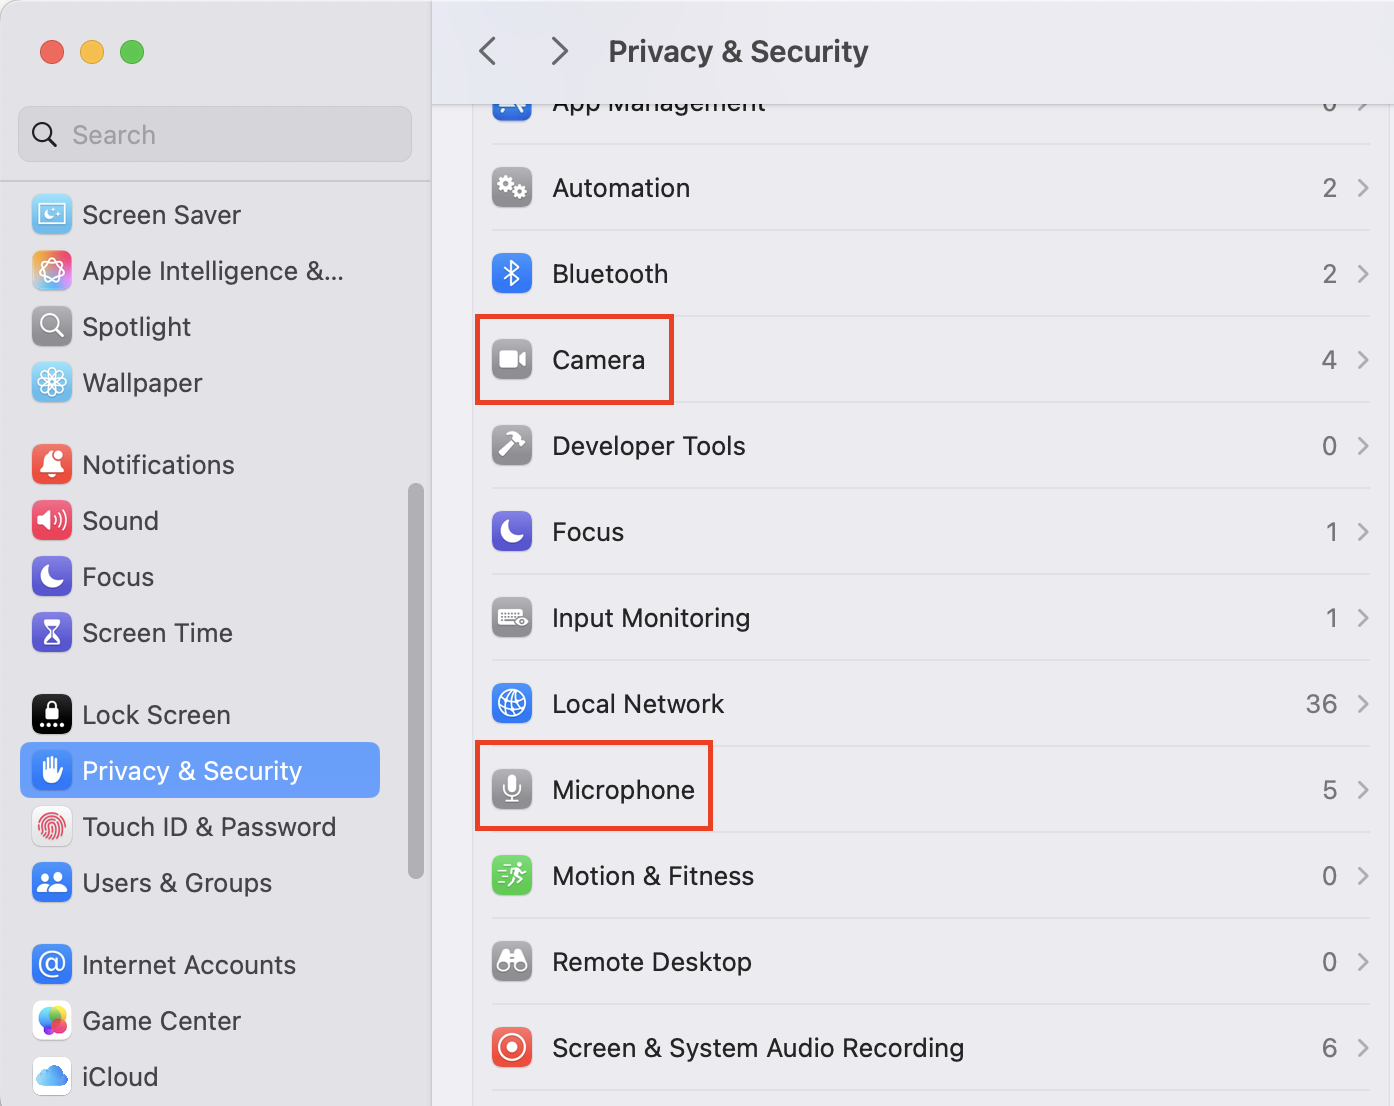
- Click the Apple menu () in the upper left corner of your screen.
- Select System Settings then click on Privacy and Security (as shown in the screenshot below).
- Click on Camera then enable Zoom and then click on Microphone and then enable Zoom.
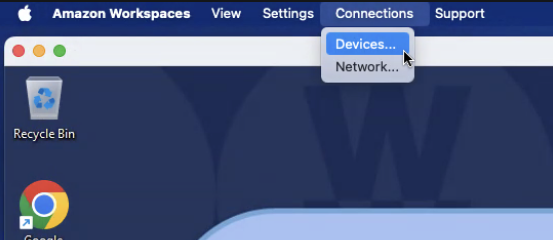
Part 2 - Configure your Webcam on your AWS Virtual Desktop
- On your AWS Workspace menu bar, click on Connections > Devices
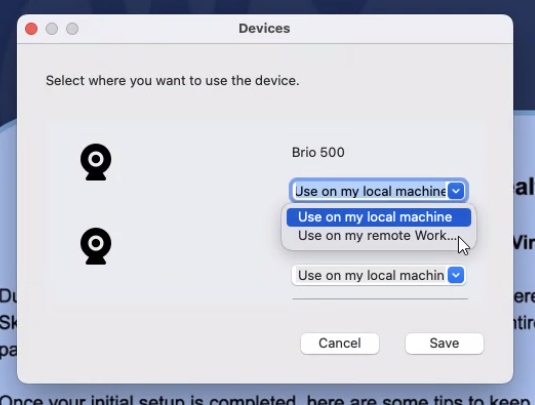
- In the Webcam device dropdown menu, change the setting to Use on my remote Workspace.
- The Workspace environment will take a moment to apply this setting. Once completed the webcam will be available to use in Zoom.
This step is required every morning when you enter your Virtual Desktop
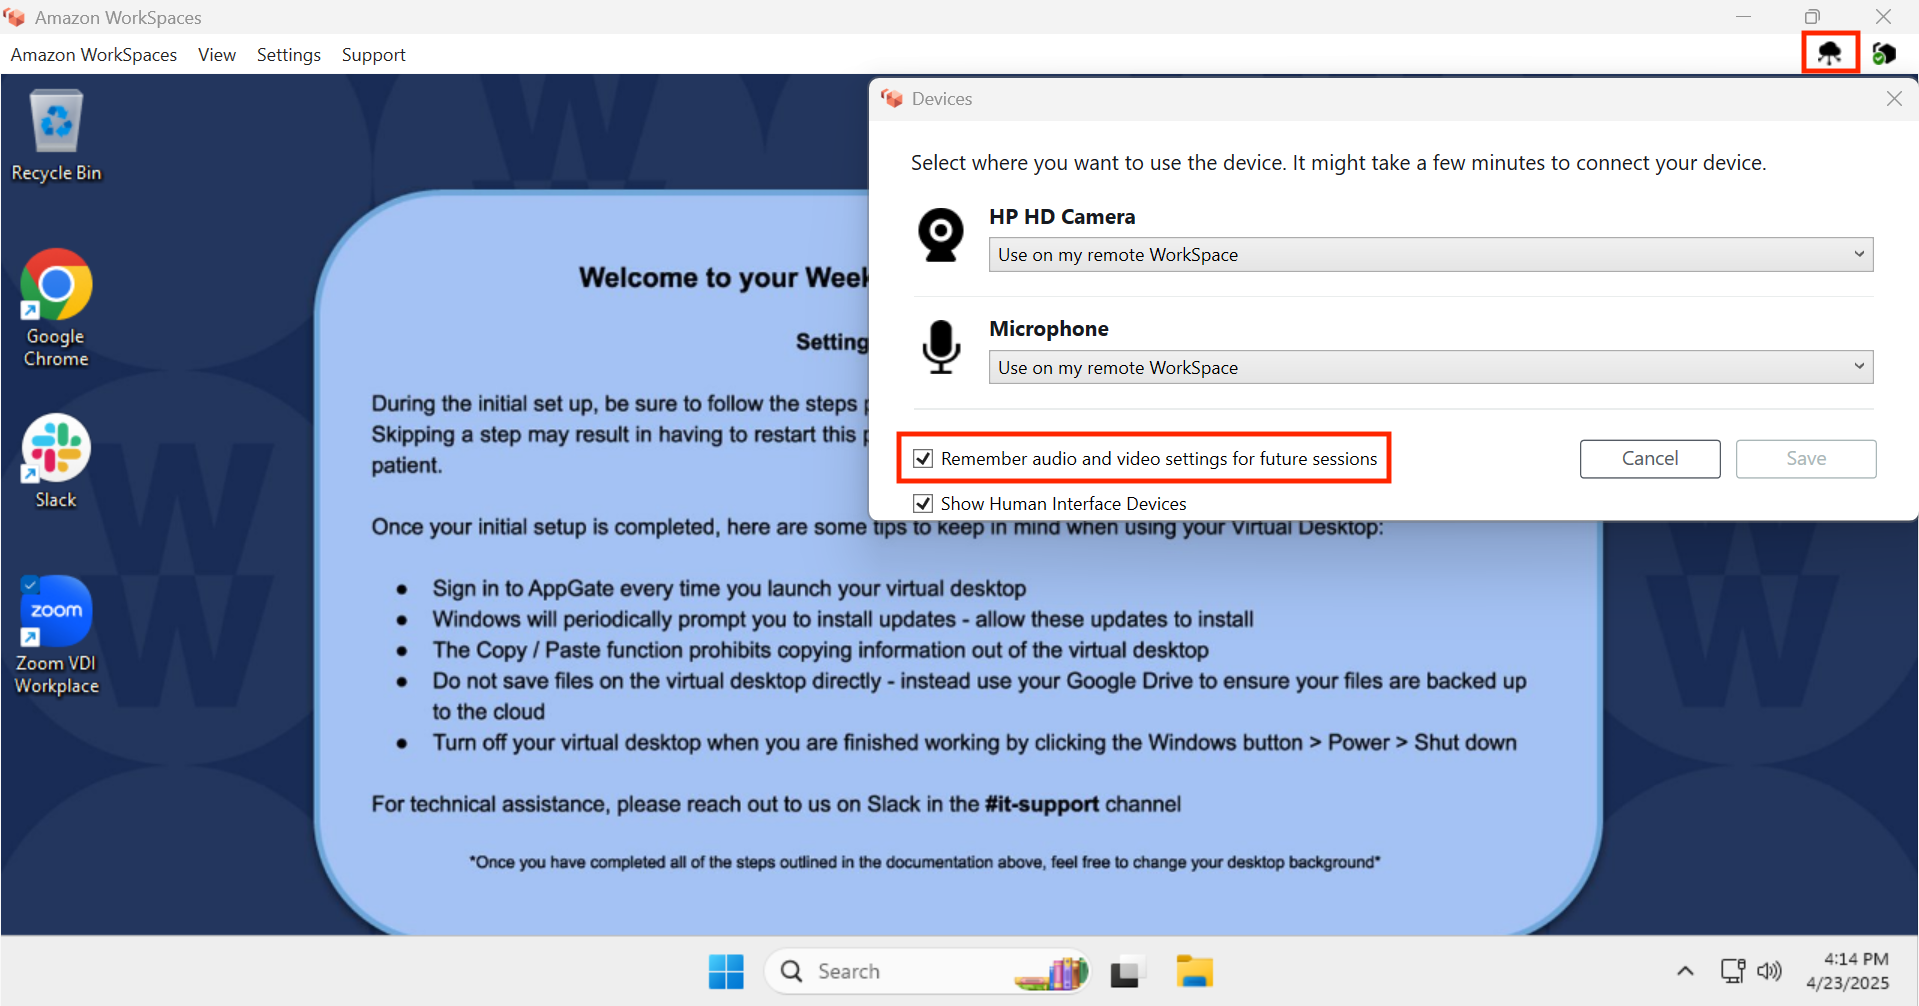
Step 10: How to fix Webcam issues for Windows (This is a ONE time change only)
- Click on the icon near the top right of the screen that is surrounded by the red square.
- Click on the Dropdown menu under Camera and select Use on my Remote WorkSpace.
- Click on the Dropdown menu under Microphone and select Use on my Remote WorkSpace.
- Tick the box named Remember audio and video settings for future use then click on Save.
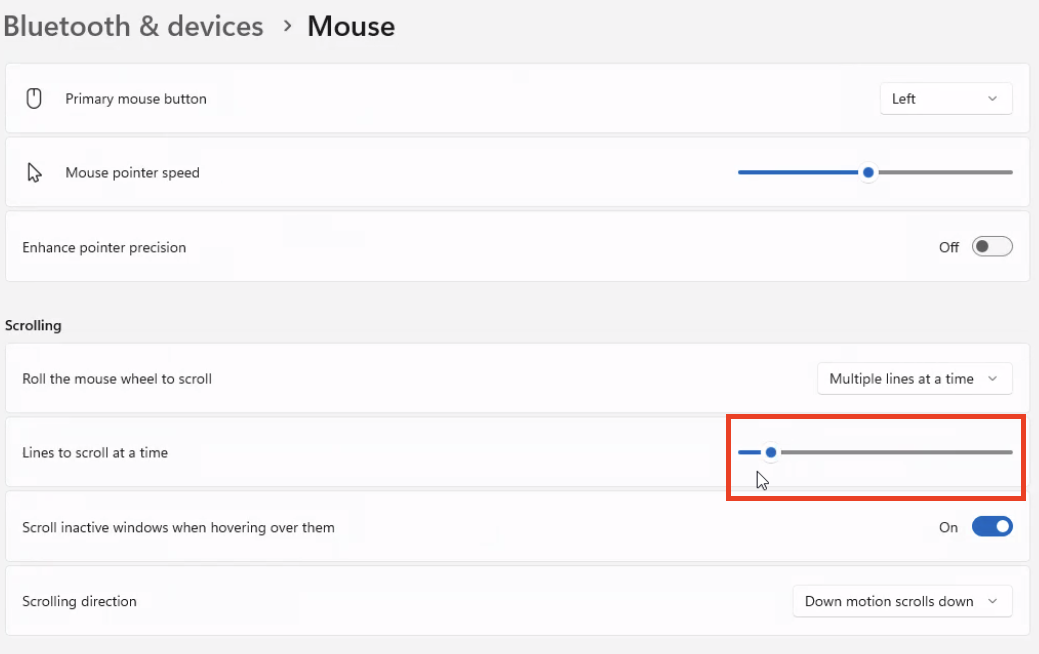
Step 11: How to fix the Bedrock Mouse scrolling issue
- In the search bar, enter Mouse and then click on Mouse settings
- Look under the Scrolling section and to the right of where it says Lines to scroll at a time, slide the bar to somewhere between 10 and 13.